You’ve got the perfect paint color, a free Saturday, and a playlist ready. What could go wrong? Oh, just a few things that can turn your “quick refresh” into a week-long saga. Let’s skip the drama and talk about the six painting mistakes everyone makes—and how to dodge them like a pro.
1. Skipping Prep Like You’re Above It
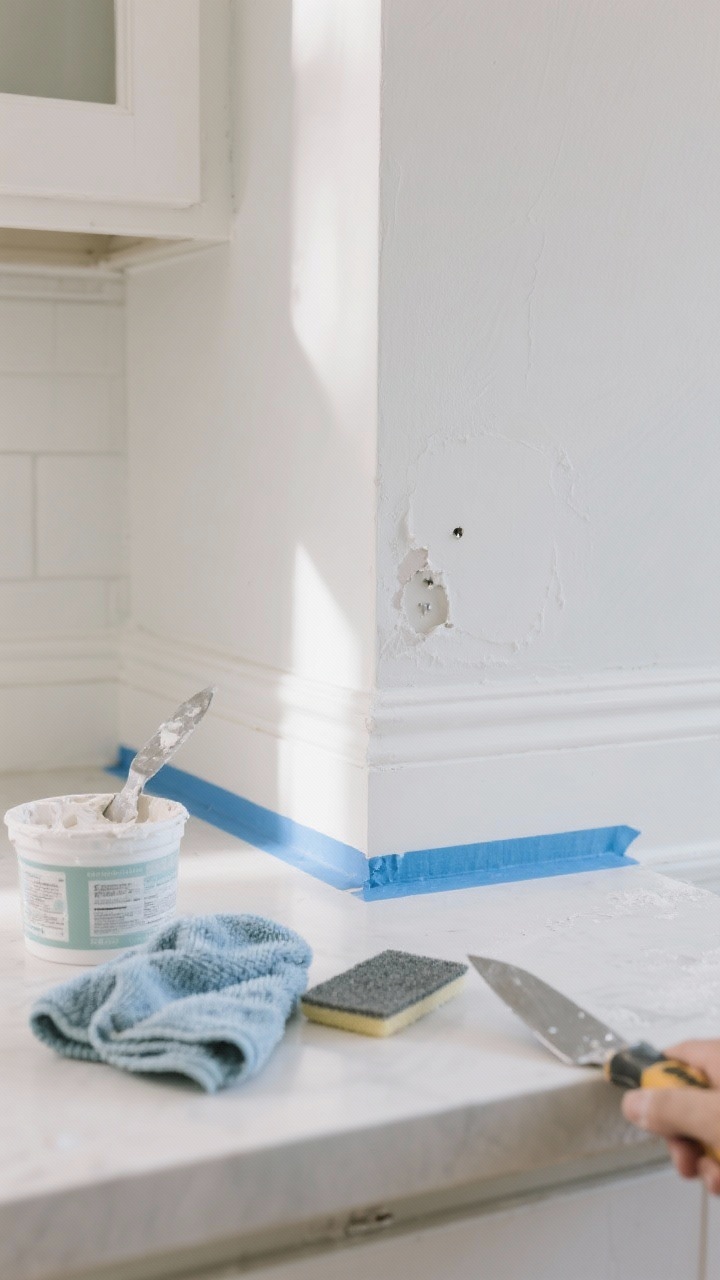
I get it—prep work feels boring. But paint is basically makeup for your walls: it only looks amazing if the base is smooth and clean. Dust, grime, and random nail holes will show up like they RSVP’d “Yes” to your paint party.
What To Do Instead
- Clean first: Degrease kitchen walls and wipe everything with a damp microfiber cloth. FYI: Dust hides in baseboards and corners.
- Fill and sand: Use spackle for holes, sand lightly with a fine-grit sponge, then wipe again.
- Tape smart: Use quality painter’s tape and press edges firmly with a putty knife for crisp lines.
Yes, it adds an hour or two. But you’ll save days of touch-ups and regret.
2. Ignoring Primer Like It’s Optional
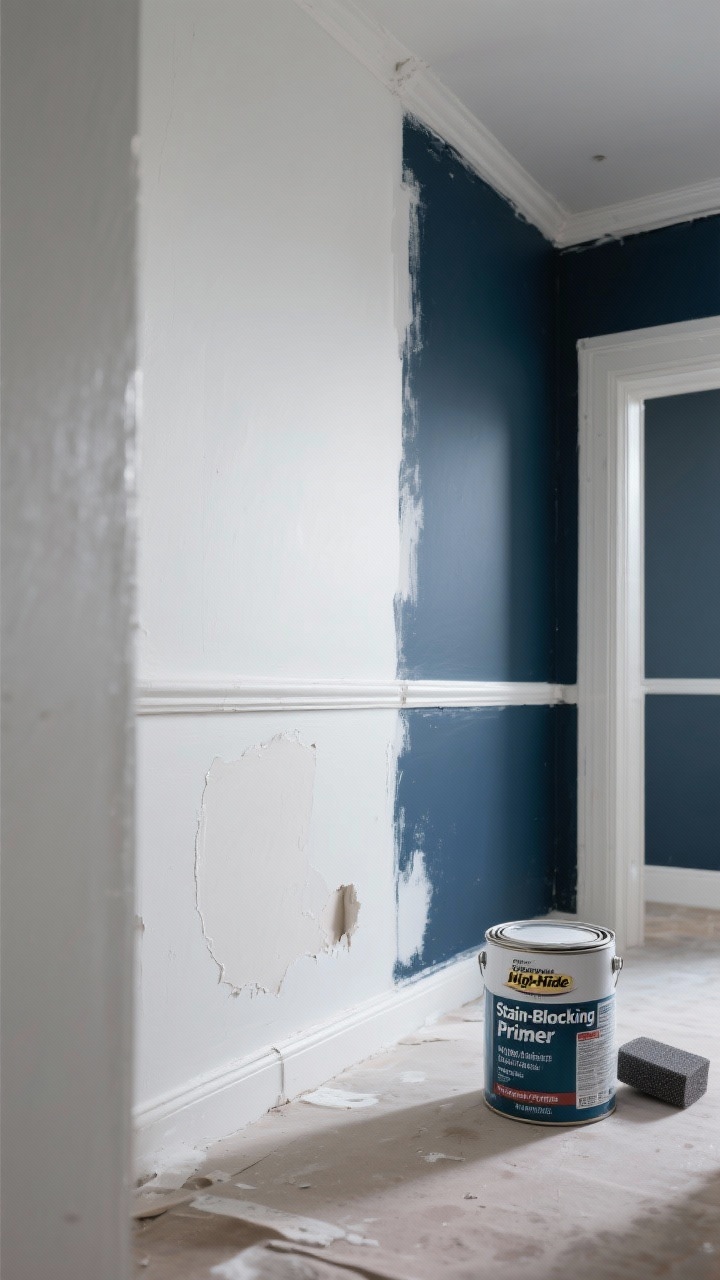
Primer is the unsung hero of a flawless finish. Skipping it can lead to blotchy walls, weird shine, or paint that peels when you so much as look at it wrong.
When You Absolutely Need Primer
- Painting over dark colors: Use a high-hide primer to block the shade beneath.
- New drywall or patched spots: Drywall soaks up paint unevenly without primer.
- Glossy surfaces: Scuff sand, then prime so the new coat sticks.
- Stains or odors: Choose a stain-blocking primer to lock them in for good.
Want to cheat? A paint-and-primer combo can work for small color shifts on previously painted walls. But for big changes, do it right and prime.
3. Choosing the Wrong Finish (Hello, Unflattering Sheen)

Color gets all the attention, but finish decides how your walls actually live. Too shiny and every bump looks like a topographical map. Too flat and you can’t clean anything without leaving a mark.
Finish Cheat Sheet
- Flat/Matte: Hides flaws, not wipeable. Best for low-traffic bedrooms and ceilings.
- Eggshell: Soft sheen, slightly washable. Great for living rooms and dining rooms.
- Satin: More durable, light sheen. Ideal for hallways, kids’ rooms, and doors.
- Semigloss: Very wipeable, shows imperfections. Best for trim, cabinets, and baths.
- High Gloss: Drama queen. Use sparingly on feature trim or furniture.
IMO, eggshell or satin are the sweet spots for most walls—pretty and practical.
4. Bad Tools, Worse Technique
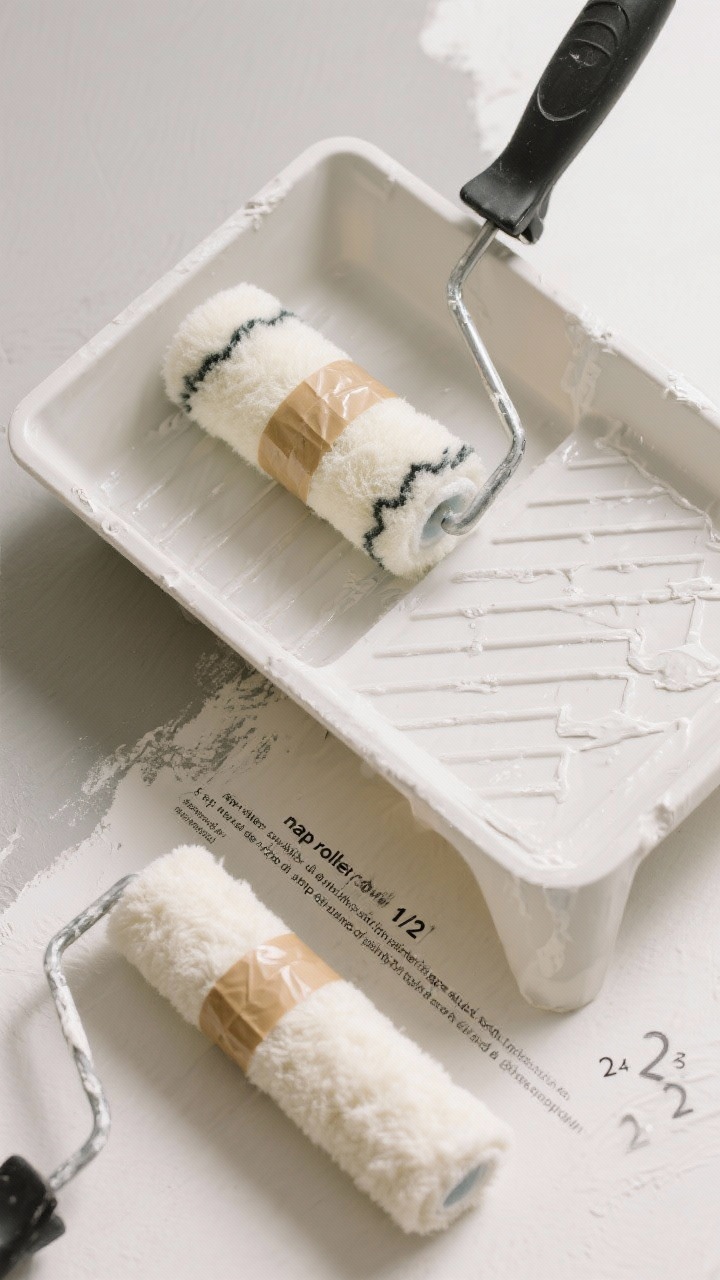
A $2 brush will betray you. Lint-y rollers? Same. You’ll spend more time picking fuzz out of your paint than painting.
Smart Tool Upgrades
- Brushes: Buy a 2–2.5-inch angled sash brush for cutting in. Look for tapered bristles, not chunky ones.
- Rollers: Use 3/8″ nap for smooth walls; 1/2″ for textured. Always “de-lint” with painter’s tape first.
- Trays and liners: Liners make cleanup quick and keep colors clean.
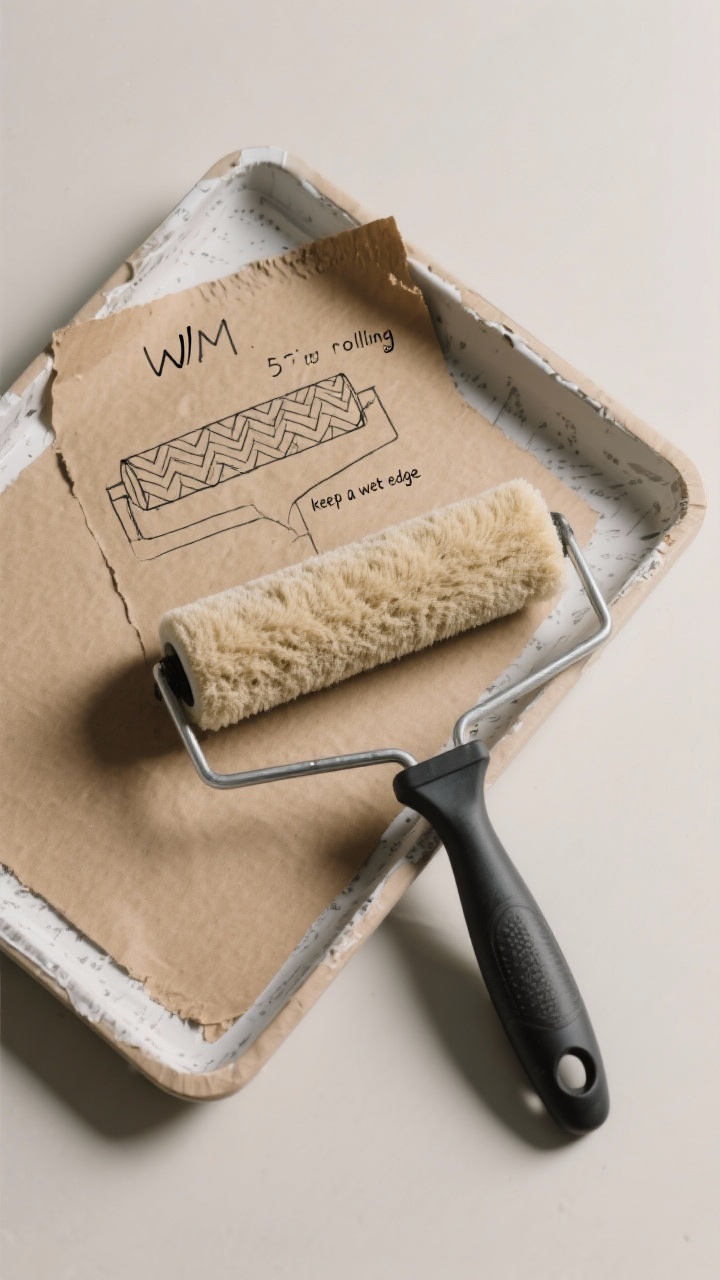
Technique That Actually Works
- Load, don’t drown: Dip roller lightly and roll off excess. You want coverage, not drips.
- Roll in a W or M: This spreads paint evenly without lines.
- Keep a wet edge: Work in small sections and overlap before the paint dries to avoid “lap marks.”
- Cut in, then roll: Blend those edges while they’re still wet for a seamless look.
Tiny change, big difference: roll from dry to wet, not the other way around.
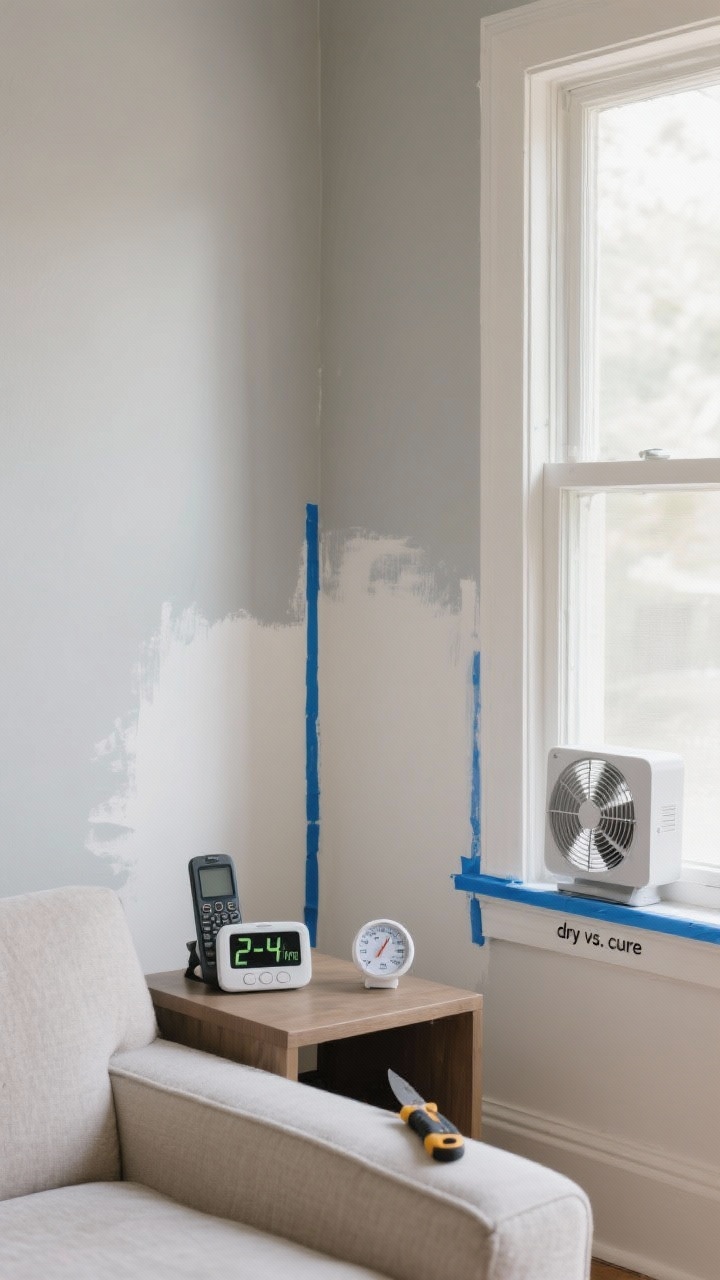
5. Bad Timing: Rushing Coats and Peeling Tape Too Late
Patience is the secret ingredient to pro-level walls. Rushing that second coat? You’ll get dragging, patchiness, and visible strokes. Waiting too long to pull tape? Enjoy your accidental wall stickers.
Timing Rules To Live By
- Dry vs. cure: Dry to the touch isn’t cured. Follow the can, but plan 2–4 hours between coats for latex paint.
- Humidity matters: High humidity slows drying. Use fans and open windows for airflow.
- Remove tape while paint is slightly wet: Pull at a 45-degree angle for a clean line.
- Second coat discipline: If your roller drags or lifts paint, it’s too soon—wait.
Pro tip: If the paint has fully dried over the tape, score the edge lightly with a utility knife before pulling.
6. Underestimating Lighting and Sample Size
That dreamy greige on Pinterest? It might look purple in your hallway. Lighting changes everything—natural light, warm bulbs, cool bulbs, you name it. Tiny paint chips won’t tell the full story.
How To Test Like A Designer
- Use large samples: Paint 12×12 swatches or use peel-and-stick samples on multiple walls.
- Check at different times: Morning, midday, evening. Colors shift with light.
- Consider undertones: Compare your pick next to a true white; blue/green/pink undertones will show.
- Match your bulbs: If you use warm LEDs, test under warm LEDs. It matters. A lot.
Also, pair your wall color with your trim color. A creamy trim can make cool walls look icy; a crisp white can sharpen everything beautifully.
Bonus: Color Pairing That Rarely Fails
- Walls: Soft neutral (warm gray, greige, or muted clay)
- Trim: Clean white in satin or semigloss
- Ceilings: Flat white to keep it airy
Final Word: Painting isn’t rocket science, but it does reward patience and prep. Avoid these six mistakes and your walls will look like you hired a pro—without the pro price tag. Now grab that roller and go make your space amazing. You’ve got this.
Explore More & Elevate Your Home
If you’re dreaming of stylish rooms, warm textures and beautiful details that transform your space, explore our Home Décor.
For soft evenings, slow routines and a home that feels like a warm hug, discover more ideas in Cozy Living.
If you’re ready for less chaos and more calm, find realistic routines and tidy-home solutions inside Organization.
For soft-life habits and everyday routines that feel good, visit our Home Lifestyle.
When you’re in the mood for glow-up projects and creative home upgrades, explore DIY & Makeovers.
And if you want your balcony, terrace or garden to feel just as cozy as your indoors, get inspired in Outdoor Living.